Presentation slides on our CI pipeline with Docker
Here are the slides on our Continuous Integration pipeline which we use to build our production ready Docker Containers.
Download the slides in pdf format: www.juhonkoti.net/media/ci-pipeline.pdf
Here are the slides on our Continuous Integration pipeline which we use to build our production ready Docker Containers.
Download the slides in pdf format: www.juhonkoti.net/media/ci-pipeline.pdf
I’ll describe our Continuous Integration pipeline which is used by several teams to develop software which is later deployed as Docker Containers. Our programmers use git to develop new features into feature branches which are then usually merged into master branch. The master branch represents the current development of the software. Most projects also have a production branch which always contains code which is ready to be deployed into production at any given moment. Some software packages use version release model so each major version has its own branch.
As developers develop their code they always run at least unit tests locally in their development machine. New code is committed into feature branch, which is merged by another developer into master and pushed to the git repository. This triggers a build in a Jenkins server. We have several Jenkins environments, the most important are testing and staging. Testing provides a CI environment for the developers to verify that their code is production compatible and the staging is for the testing team so that they can have their time to test a release candidate before its actually deployed into production.
The CI service runs a Linux with Docker support. A Jenkins instance is currently installed directly into the host system instead of a container (we had some issues with it as it needs to launch containers). Two sets of backend services are also started into the server: A minimal set required for a development environment. These containers run with –net=host mode and they bind to their default ports. These are used for the unit tests.
Then there’s a separated set of services inside containers which form a complete set that looks just like production environment. The services also obtain fresh backups from production databases so that the developers can test the new code against a copy of live data. These services run with the traditional docker mode, so they each have their own IP from the 178.18.x.x address space. More on this later.
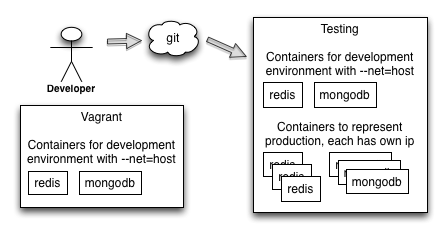
Developers can run a subset of required services in their development laptops. This means that for each database type (redis, mongodb etc) only a minimal amount of processes are started (say one mongodb, one redis and no more). This is so that the environment doesn’t consume too much resources. The tests can also be programmed to assume that there’s actual databases behind. When the tests are executed in a CI machine a similar set of services is found on the ports at localhost of the machine. So the CI machine has both a set of services bound to localhost default ports and then a separated set of services which represent the production environment (see next paragraph)
We also use a single Vagrant image which contains this minimal set of backend services inside containers so that the developers can easily spawn the development environment into their laptops.
When a build is triggered the following sequence is executed. A failure in any step break the execution chain and the build is marked as a failure:
Each of our service has an unique service name, for example a set of mongodb services would have names “mongodb-cluster-a-node-1” to “mongodb-cluster-a-node-3”. This name is used to create a dns record: “mongodb-cluster-a-node-1.us-east-1.domain.com” so that each production region has its own domain (here “us-east-1.domain.com”). All our services use /etc/resolv.conf to add the region domain into its search path. This results that the applications can use the plain service name without the domain to find the services. This has the additional benefit that we can run the same backend services in our CI servers so that the server has a local dns resolver which resolves the host names to docker container.
Consider this setup:
When the application is run in testing or staging: Application resolves mongodb-cluster-a-node-1. The request goes to a local dnsmasq in the CI machine, which resolves the name “mongodb-cluster-a-node-1” into a container at ip 172.18.2.1. Application connects to this ip which is locally in the same machine.
When the application is run in production: Application resolves mongodb-cluster-a-node-1. The request goes into the libc dns lookup code which uses the search property from /etc/resolv.conf. This results that a DNS query is eventually done for mongodb-cluster-a-node-1.us-east-1.domain.com, which returns an IP in an arbitrary machine.
This setup allows us to use the same configurations in both testing, staging and production environments, so that we can verify that all high availability client libraries can connect to all required backends and that the software will work in the production environment.
This setup suits our needs quite well. It leverages the sandboxing which Dockers gives us and enables us to do new deployments with great speed: The CI server needs around three minutes to finish a single build plus two minutes for deployment with our Orbitctl tool, which deserves its own blog post. The developers can use the same containers in a compact Vagrant environment which we use to run our actual production instances, reducing the overhead for maintaining separated environments.