Having Fun With IoT

With the blazing fast technology progress it’s now easier than ever to build all kinds of interconnected gadgets, something which the corporate world might refer as IoT – Internet Of Things. For me, it’s just an excuse to spend time playing around with electronics. I’ve been installing all kinds of features into our summer cottage (or mökki, as it’s called in Finnish), so this blog post shows around some things which I’ve done.

All the things where Raspberry Pi is useful!

I’ve lost count how many Raspberry Pi’s I’ve installed. Our cottage has two of them. My home has couple. My office has at least 20 of them. My dog would probably carry one as well, but that’s another story. As Pi runs standard Linux, all the standard Linux knowledge applies, so we can run databases, GUI applications and do things with your favourite programming language.

So far I’ve found it useful to do:

  • Connect our ground heating pump (maalämpöpumppu) to a Raspberry Pi with a usb-serial cable. This gives me full telemetry and remote configuration capabilities, allowing me to save energy by keeping the cottage temperature down when I’m not there and to warm it up before I arrive.
  • Work as a wifi-to-3g bridge. With a simple USB-3G dongle, an USB-WIFI dongle and a bit of standard Linux scripts you can have it to work as an access point for the Internet.
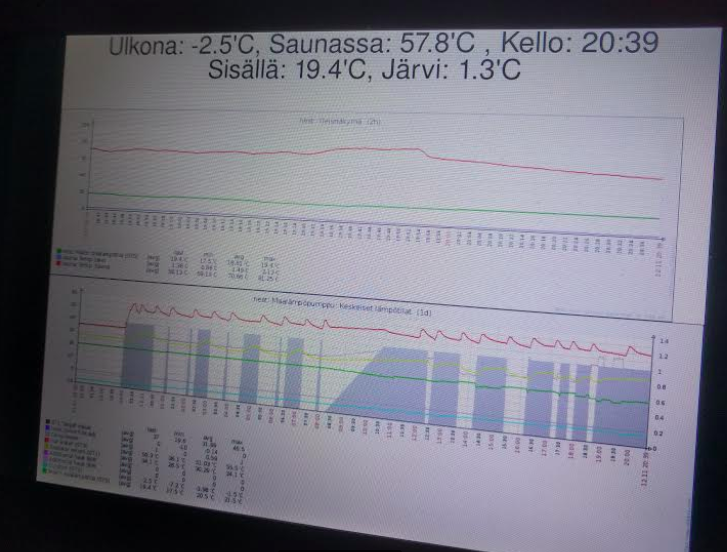
  • Display dashboards. Just hook the Pi up into a TV with HDMI, run Chrome or Firefox in full screen mode and let it display whatever information best floats your boat.
  • Connect DS18b20 temperature sensors. These are the legendary tiny Dallas 1-wire sensors. They look like transistors, but instead they offer digital temperature measurements from -55’C to +125’C in up to 0.5’C resolution. I have several them around, including in Sauna and in the lake. You can buy them in pre-packaged into the end of a wire or you can solder one directly to your board.
  • Run full blown home automation with Home Assistant and hook it up into a wireless Z-Wave network to control your pluggable lighting, in-wall installed light switches or heating.

All the things where a Raspberry Pi is too big

Enter Arduino and ESP8266. Since its introduction in 2005, the Arduino embedded programming ecosystem has revolutionized DIY electronics, opening the doors to build all kinds of embedded hobby systems easily. Recently a Chinese company built a chip containing full Wifi and TCP/IP stack, perfectly suitable to be paired with Arduino. So today you can buy a full WiFi capable Arduino chip (NodeMCU) for less than three euros a piece. With a bit care you can build remote sensors capable of operating under battery power for an impressive amount of time.

Using Raspberry Pi to log temperatures

The DS18b20 sensors are great. They can operate with just two wires, but it’s best to use a three wire cable: One is for ground, another is for operating power and 3rd is for data. You can put them comfortably over 30 meters away from the master (your raspberry pi) and you can have dozens of sensors in a same network as they each have a unique identifier. Reading temperature values from them is also easy as most Raspberry Pi distributions have easy-to-use drivers for them by default. The sensors are attached to the Raspberry Pi extension bus with a simple pull-down resistor. See this blog post for more info. Here’s my code to read sensor values and write the results into MQTT topics.

Using MQTT public-subscribe messaging for connecting everything together.

MQTT is a simple public-subscribe messaging system widely used for IoT applications. In this example we publish the read sensor values to different MQTT topics (for example I have nest/sauna/sauna for the temperature of sauna. I just invented that every topic in my cottage begins with “nest/”, then the “nest/sauna” means values read by the raspberry pi in the sauna building and then the last part is the sensor name).

On the other end you can have programs and devices reading values from an MQTT broker and reacting based on those values. The usual model is that each sensor publishes their current value to the MQTT bus when the value is read. If the MQTT server is down, or a device listening for the value is down, then the value is simply lost and the situation is expected to be recovered when the devices are back up. If you care for getting a complete history even during downtime, you need to build some kind of acknowledgment model, which is beyond the scope of this article.

To do this you can use mosquitto which can be installed into a recent Raspbian distribution with simply “apt-get install mosquitto”. The mosquitto_sub and mosquitto_pub programs are in the “mosquitto-clients” package.

Building a WiFi connected LCD display

My latest project was to build a simple wifi connected LCD display to show the temperature of the Sauna and the nearby lake, and emit a buzzer beep when one needs to go and put more wood in the fireplace when the sauna is warming up.

Here’s the quick part list for the display. You can get all these from Aliexpress for around 10 euros total (be sure to filter for free shipping):

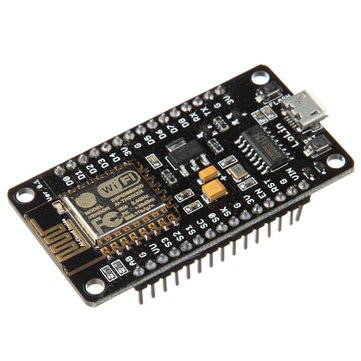
  • A NodeMCU ESP8266 Arduino board from Aliexpress.
  • An LCD module. I bought both 4*20 (Google for LCD 2004) and 2*16 (LCD 1602), but the boxes I ordered were big enough only for the smaller display.
  • An I2C driver module for the LCD (Google for IIC/I2C / Interface LCD 1602 2004 LCD). This is used to make connecting the display to Arduino a lot easier.
  • Standard USB power source and a micro-usb cable.
  • A 3.3V buzzer for making the thing beep when needed.
  • A resistor to limit the current for the buzzer. The value is around 200 – 800 Ohm depending on the volume you want.

Soldering the parts together is easy. The I2C module is soldered directly to the LCD board and then four wires are used to connect the LCD to the NodeMCU board. The buzzer module is connected in series with the resistor between a ground pin and a GPIO pin on the NodeMCU (this is needed to limit the current used by the buzzer. Otherwise this would fry the Arduino GPIO pin). The firmware I made is available here. Instructions on how to configure Arduino for the NodeMCU are here.

When do I need to add more wood to the stove?

One you have your sensors measuring things and devices capable acting on those measurements, you can build intelligent logic to react on different situations. In my case I wanted to have my LCD device to buzz when I need to go outside to add more wood to the sauna’s stove when I’m heating the sauna. Handling this needs some state to track the temperature history and to execute some logic to determine when to buzz. All this could be programmed into the Arduino micro-controller running the display, but modifying this requires to reprogram the device by attaching a laptop with USB to the device.

I instead opted into another way: I programmed my LCD to be stupid. It simply listens MQTT topics for orders what to display and when to buzz. Then I placed a ruby program in my raspberry pi which listens for the incoming measurements about the sauna temperature and where all the business logic is handled. Then this script will order the LCD to display current temperature, or any other message for that matter (for example the “Please add more wood” message). The source code for this is available here.

The program listens for the temperature measurements and stores them in a small ring buffer. Then on each received measurement it calculates the temperature change in the last five minutes. If the sauna is heating up and the change in the last 5min is less than two ‘C warmer, then we know that the wood is almost burned up and we need to signal the LCD to buzz. The program also has a simple state machine to determine when to do the tracking and when it needs to be quiet. The same program also formats the messages which the LCD displays.

Conclusions

You can easily build intelligent and low-cost sensors to measure pretty much any imaginable metric in a modern environment. Aliexpress is full of modules for measuring temperature, humidity, CO2 levels, flammable gases, distance, weight, magnetic fields, light, motion, vibrations and so on. Hooking them together is easy using either Raspberry Pi or an ESP8266/Arduino and you can use pretty much any language to make them act together intelligently.

Any individual part here should be simple to build and there are a lot of other blog posts, tutorials and guides all around the net (I tried to link some of them in this article). Programming an Arduino is not hard and the ecosystem has very good library for attaching all kinds of sensors into the platform. Managing a Raspberry Pi is just like managing any other Linux. When you know that things can be done then you just need some patience while you learn the details and make things work as you want.

DNA Welho cable modem IPv6 with Ubiquiti EdgeMax

DNA/Welho recently announced their full IPv6 support. Each customer gets an /56 prefix via dhcpv6. Here’s my simple configuration on how to get things running with EdgeMax. This assumes that the cable modem is in bridged mode and connected to eth0. eth1 is the LAN port.

set firewall ipv6-name WANv6_IN default-action drop
set firewall ipv6-name WANv6_IN description 'WAN inbound traffic forwarded to LAN'
set firewall ipv6-name WANv6_IN enable-default-log
set firewall ipv6-name WANv6_IN rule 10 action accept
set firewall ipv6-name WANv6_IN rule 10 description 'Allow established/related sessions'
set firewall ipv6-name WANv6_IN rule 10 state established enable
set firewall ipv6-name WANv6_IN rule 10 state related enable
set firewall ipv6-name WANv6_IN rule 15 action accept
set firewall ipv6-name WANv6_IN rule 15 description 'Allow ICMPv6'
set firewall ipv6-name WANv6_IN rule 15 protocol ipv6-icmp
set firewall ipv6-name WANv6_IN rule 20 action drop
set firewall ipv6-name WANv6_IN rule 20 description 'Drop invalid state'
set firewall ipv6-name WANv6_IN rule 20 state invalid enable
set firewall ipv6-name WANv6_LOCAL default-action drop
set firewall ipv6-name WANv6_LOCAL description 'Internet to router'
set firewall ipv6-name WANv6_LOCAL enable-default-log
set firewall ipv6-name WANv6_LOCAL rule 1 action accept
set firewall ipv6-name WANv6_LOCAL rule 1 description 'allow established/related'
set firewall ipv6-name WANv6_LOCAL rule 1 log disable
set firewall ipv6-name WANv6_LOCAL rule 1 state established enable
set firewall ipv6-name WANv6_LOCAL rule 1 state related enable
set firewall ipv6-name WANv6_LOCAL rule 3 action accept
set firewall ipv6-name WANv6_LOCAL rule 3 description 'allow icmpv6'
set firewall ipv6-name WANv6_LOCAL rule 3 log disable
set firewall ipv6-name WANv6_LOCAL rule 3 protocol icmpv6
set firewall ipv6-name WANv6_LOCAL rule 5 action drop
set firewall ipv6-name WANv6_LOCAL rule 5 description 'drop invalid'
set firewall ipv6-name WANv6_LOCAL rule 5 log enable
set firewall ipv6-name WANv6_LOCAL rule 5 state invalid enable
set firewall ipv6-name WANv6_LOCAL rule 8 action accept
set firewall ipv6-name WANv6_LOCAL rule 8 description 'DHCPv6 client'
set firewall ipv6-name WANv6_LOCAL rule 8 destination port 546
set firewall ipv6-name WANv6_LOCAL rule 8 log disable
set firewall ipv6-name WANv6_LOCAL rule 8 protocol udp
set firewall ipv6-receive-redirects disable
set firewall ipv6-src-route disable
set interfaces ethernet eth0 address dhcp
set interfaces ethernet eth0 description wan
set interfaces ethernet eth0 dhcpv6-pd pd 0 interface eth1 host-address '::1'
set interfaces ethernet eth0 dhcpv6-pd pd 0 interface eth1 service slaac
set interfaces ethernet eth0 dhcpv6-pd pd 0 prefix-length 56
set interfaces ethernet eth0 dhcpv6-pd rapid-commit enable
set interfaces ethernet eth0 firewall in ipv6-name WANv6_IN
set interfaces ethernet eth0 firewall local ipv6-name WANv6_LOCAL
set interfaces ethernet eth0 ipv6 dup-addr-detect-transmits 1

Here’s a quick explanation on the key details: dhcpv6-pd is a way to ask for a prefix block from the ISP. The ISP will assign a /128 point-to-point ip to the WAN interface which the ISP uses as the gateway to the prefix which it gives to you. You could simply just say “set interfaces ethernet eth0 dhcpv6-pd” and you would only get the /128 point-to-point link, which is enough for the router to connect to public ipv6 but not else.

The “set interfaces ethernet eth0 dhcpv6-pd pd 0” block is the request for the /56 prefix. This prefix will be then assigned to one interface (eth1) so that the interface will get an ip ending with ::1 and then the subnet is served via a slaac protocol to the clients.

Notice that there seems to be a small bug: If you did just “set interfaces ethernet eth0 dhcpv6-pd” and committed that, additional “dhcpv6-pd pd” settings wont work unless you first “delete interfaces ethernet eth0 dhcpv6-pd” and commit that.

IPv6 changes several key features when compared to IPv4 so be ready to learn again how ARP requests works (hint, there’s no ARP requests any more), how multicast is used in many places and how interfaces have several IPv6 addresses in several networks (link-local, public etc). Here’s one helpful page which explains more on the prefix delegation.

Great Chinese Firewall DDOSing websites

We recently got reports from two different small eCommerce related websites who started to see big amounts of traffic originating from Chinese IP addresses which contained the same path as our SDK which is shipped within mobile games, but destined into their ip address.

This made no sense at all.

We of course responded to the hostmasters tickets and assured that we would do everything to find the reason what is causing this, because effectively it looked like we were sending a distributed denial service attack against these websites.

After some googling we found out first this post: http://comments.gmane.org/gmane.network.dns.operations/4761 and then this better blog which described exactly what we had seen. https://en.greatfire.org/blog/2015/jan/gfw-upgrade-fail-visitors-blocked-sites-redirected-porn

So what’s going on is that if an url is blocked by the Chinese firewall the firewall DNS will respond with another ip which goes into another working website instead of the ip where it should go. According to the blog post the motivation might be that China wants the users to think that everything is working by sending them to another webpage. Too bad that it ends up causing a lot of harm into innocent admins all around the world.

Currently we are looking to change our systems to direct the Chinese users into another CDN host which aren’t affected, but as the previous Chinese firewall problem was just a couple of months ago I don’t see any way to easily fix this issue for good.

Raspberry Pi as a 3G to WiFi access point and home automation

I’ve just deployed a Raspberry Pi into our summer cottage to function as a general purpose home automation and internet access point. This allows visitors to connect to internet via wifi and also enables remote administration, environmental statistics and intrusion alerts.

Parts:

  • Raspberry Pi, 4GB memory card
  • PiFace Digital (for motion sensors and heating connection, not yet installed)
  • D-Link DWA-127 Wi-Fi USB (works as an access point in our case)
  • Huawei 3G USB dongle (from Sonera, idVendor: 0x12d1 and idProduct:          0x1436) with a small external antenna.
  • Two USB hubs, one passive and another active with 2A power supply
  • Old TFT display, HDMI cable and keyboard

I’m not going into the details how to configure this, but I’ll give a quick summary:

  • Sakis3G script to connect the 3G to Internet. Works flawlessly.
  • umtskeeper script which makes sure that sakis3g works always. Can reset USB bus etc. Run from /etc/rc.local on startup.
  • hostapd to make the D-Link WiFi to act as an access point.

In addition I run OpenVPN to connect the network into the rest of my private network, so I can always access the rpi remotely from anywhere. This also allows remote monitoring via Zabbix.

Plans for future usage:

  • Connect to the building heating system for remote administration and monitoring.
  • Attach USB webcams to work as CCTV
  • Attach motion sensors for security alarm. Also record images when sensors spot motion and upload directly to internet.
  • Attach a big battery so that the system will be operational during an extended power outage.

Setting backup solution for my entire digital legacy (part 2 of 2)

As part of my LifeArchive project, I had to verify that I have sufficient methods to back all my valuable assets so well that they will last for decades. Sadly, there isn’t currently any mass media storage available that is known to function for such a long time, and in any way you must prepare for losing a site due to floods, fire and other disasters. This post explains how I solved my backup needs for my entire digital legacy. Be sure to read the first part: LifeArchive – store all your digital assets safely (part 1 of 2)

The cheapest way to store data currently is to use hard disks. Google, Facebook, The Internet Archive, Dropbox etc are all known to host big data centers with a lot of machine with a lot of disks. Also at least Google is known to use tapes for additional backups, but they are way too expensive for this kind of small usage.

Disks have also their own problem. The biggest problem is that they tend to break. Another problem is that they might corrupt your data, which is a problem with traditional raid systems. As I’m a big fan of ZFS, my choose was to build a SAN on top of it. You can read more on this process from this blog post: Cheap NAS with ZFS in HP MicroServer N40L

Backups

As keeping your eggs in one basked is just stupid, having a good and redundant backup solution is the key to success. As in my previous post, I concluded that using cloud providers to solely host your data isn’t wise, but they are a viable choice for doing backups. I’ve chosen to use CrashPlan, which is a really nice cloud based software for doing increment backups. Here are the cons and the pros for CrashPlan:

Pros:

  • Nice GUI for both backing up and restoring files
  • Robust. The backups will eventually complete and the service will notify you by email if something is broken
  • Supports Windows, OS X, Linux and Solaris / OpenIndiana
  • Infinitive storage on some of the plans
  • Does increment backups, so you can find the lost file from history.
  • Allows you to backup to both CrashPlan cloud and to your own storage if you run the client in multiple machines.
  • Allows you to backup to your friends machine (this doesn’t even cost you anything), so you can establish a backup ring with a few of your friends.

Cons:

  • It’s still a black-box service, which might break down when you least expect
  • CrashPlan cloud is not very fast: Upload rate to CrashPlan cloud is around 1Mbps and download (restore) around 5Mbps
  • You have to fully trust and rely on the CrashPlan client to work – there’s no another way to access the archive except using the client.

I setup the CrashPlan client to backup into its cloud and in addition to Kapsi Ry’s server where I’m running a copy of the CrashPlan client. Running your own client is easy and it gives me a much faster way to recover the data when I need to. As the data is encrypted, I don’t need to worry that there’s also a few thousand other users in the same server.

Another parallel backup solution

Even when CrashPlan feels like a really good service, I still didn’t want to trust solely to its services. I can always somehow forget to enter my new credit card number and let the data there expire, only to have a simultaneous fatal accident on my NAS. So that’s why I wanted to have a redundant backup method. I happen to get another used HP MicrosServer for a good bargain, so I setup it similarly to have three 1TB disks which I also happend to have laying around unused from my previous old NAS. Used gear, used disks, but they’re good enough to act as my secondary backup method. I will of course still receiver email notifications on disk failures and broken backups, so I’m well within my planning safety limits.

This secondary NAS lives at another site and it’s connected with an openvpn network to the primary server in my home. It also doesn’t allow any incoming connections from anywhere outside, so it’s also quite safe. I setup a simple rsync script from my main NAS to sync all data to this secondary NAS. The rsync script uses –delete -option, so it will remove files which have been deleted from the primary NAS. Because of this I also use a crontab entry to snapshot the backup each night. This will protect me if I accidentally delete files from the main archive. I keep a week worth of daily snapshots and a few month of weekly snapshots.

One best pros with this when comparing to CrashPlan is that the files are sitting directly on your filesystem. There’s no encryption nor any proprietary client and tools you need to rely, so you can safely assume that you can always get an access to your files.

There’s also another option: Get a few USB disks and setup a schema where you automatically copy your entire archive to one disk. Then every once in a while unplug one of those, put it somewhere safe and replace it with another. I might do something like this once a year.

Verifying backups and monitoring

“You don’t have backups unless you have proven you can restore from them.” – a well known truth that many people tend to forget. Rsync backups are easy to verify, just run the entire archive thru sha1sum on both sides and verify that the checksums match. CrashPlan is a different beast, because you need to restore the entire archive to another place and verify it from there. It’s doable, but currently it can’t be automated.

Monitoring is another thing. I’ve built all my scripts so that they will email me if there’s a problem, so I can react immediately on error. I’m planning to setup a Zabbix instance to keep track, but I haven’t yet bothered.

Conclusions

Currently most of our digital assets aren’t stored safely enough that you can count that they all will be available in the future. With this setup I’m confident that I can keep all my digital legacy safe from hardware failures, cracking and human mistakes. I admit that the overal solution isn’t simple, but it’s very well doable for an IT-savvy person. The problem is that currently you can’t buy this kind of setup anywhere as a service, because you can’t be 100% sure that the service will keep up in the upcoming decades.

This setup will also work as a personal cloud, assuming that your internet link is fast enough. With the VPN connections, I can also let my family members to connect into this archive and let them store their valuable data. This is very handy, because that way I will know that I can access my parents digital legacy, who probably can’t do all this by themselves alone.

Optimize nginx ssl termination cpu usage with cipher selection

I have a fairy typical setup where I have nginx in front of haproxy, where nginx is terminating the ssl connections from client browsers. As our product grew, my loadbalancer machines didn’t have enough CPU to do all the required ssl processing.

As this zabbix screenshot shows, the nginx takes more and more cpu, until it hits the limit of our AWS c1.xlarge instance. This causes delays for our users and some requests might even time out.

Luckily it turns out that there was a fairy easy way to solve this. nginx defaults, at least in our environment, into a cipher called DHE-RSA-AES256-SHA. This cipher uses Diffie-Hellman Ephemeral key exchange protocol, which uses a lot of CPU. With help from this and this blog posts I ended up with the following sollution:

First check if your server uses the slow DHE-RSA-AES256-SHA cipher:

openssl s_client -host your.host.com -port 443

Look for the following line:

Cipher    : DHE-RSA-AES256-SHA

This tells us that we can optimize the CPU usage by selecting faster cipher. Because I’m using AWS instances and these instances don’t support the AESNI (Hardware accelerated processor instructions for calculationg AES) I ened up with following cipher list (read more what this means from here):

RC4-SHA:AES128-SHA:AES:!ADH:!aNULL:!DH:!EDH:!eNULL

If your box can support AESNI you might want to prefer AES over RC4. It’s not the safest cipher choice out there, but more than good enough for our use. Check out this blog post for more information.

So, I added these two lines to my nginx.conf

ssl_ciphers RC4-SHA:AES128-SHA:AES:!ADH:!aNULL:!DH:!EDH:!eNULL;
ssl_prefer_server_ciphers on;

After restarting nginx you should verify that the correct cipher is now selected by running the openssl s_client command again. In my case it now says:

Cipher    : RC4-SHA

All done! My CPU load graphs also shows a clear performance boost. Nice and easy victory.


Saunalahden mokkulan asennus OS X:ään, error 5370

Törmäsin asennusongelmiin Saunalahden mobiilitikun ohjelmiston kanssa yrittäiessäni asentaa sitä OS X:ään (10.6.5). Asennusohjelma ilmoitti virheen “An internal error has occured during configuration (5370)”.

Ongelma voidaan ratkaista seuraavasti:

  1. Avaa Pääte (Terminal)
  2. Kirjaudu superkäyttäjäksi komennolla sudo ja antamalla oma salasanasi.
  3. Siirry oikeaan hakemistoon komennolla: cd “/Applications/Elisa/Mobiililaajakaista opastettu asennus.app/Contents/MacOS” (huomaa lainausmerkit ja välilyönnit)
  4. Käynnistä asennusohjelma komennolla: ./MobileManager\ Setup\ Assistant

Asennusohjelman pitäisi tämän jälkeen suoriutua tehtävästään ongelmitta.

Script and template to export data from haproxy to zabbix

I’ve just created a zabbix template with a script which can be used to feed performance data from haproxy to zabbix. The script firsts uses HTTP to get the /haproxy?stats;csv page, parses the CSV and uses zabbix_sender command line tool to send each attribute to the zabbix server. The script can be executed on any machine which can access both zabbix server and the haproxy stats page (I use the machine which runs the zabbix_server). The script and template works on both zabbix 1.6.x and 1.8.x.

As the haproxy server names might differ from zabbix server names, the script uses annotations inside the haproxy.cfg hidden in comments. The annotations tell the script which frontend and server node statistics should be sent to the zabbix server. This allows you to keep the configuration in a central place which helps keeping the haproxy and zabbix configurations in sync. The template includes two graphs, example below:

I’ve chosen to export following attributes from haproxy, but more could be easily added (I accept patches via github.com):

  • Current session count
  • Maximum session count
  • Sessions per second
  • HTTP responses per minute, grouped by 1xx, 2xx, 3xx, 4xx and 5xx.
  • Mbps in (network traffic)
  • Mbps out (network traffic)
  • Request errors per minute
  • Connection errors per minute
  • Response errors per minute
  • Retries (warning) per minute
  • Rate (sessions per second)
  • HTTP Rate (requests per second)
  • Proxy name in haproxy config
  • Server name in haproxy config

The code is available at github: https://github.com/garo/zabbix_haproxy The script supports HTTP Basic Authentication and masking the HTTP Host-header.

Usage:

  1. Import the template_haproxyitems.xml into Zabbix.
  2. Add all your webservers to zabbix as hosts and link them with the Template_HAProxyItem
  3. Add all your frontends to zabbix as hosts and link them with the Template_HAProxyItem. The frontend hosts don’t need to be mapped to any actual ip nor server, I use the zabbix_server ip as the host ip for these.
  4. Edit your haproxy.cfg file and add annotations for the zabbix_haproxy script. These annotations mark which frontends and which servers you map into zabbix hosts. Notice that the annotations are just comments after #, so haproxy ignores them.
    frontend irc-galleria # @zabbix_frontend(irc-galleria)
            bind            212.226.93.89:80
            default_backend lighttpd
    
    backend lighttpd
            mode            http
            server  samba           10.0.0.1:80    check weight 16 maxconn 200   # @zabbix_server(samba.web.pri)
            server  bossanova       10.0.0.2:80    check weight 16 maxconn 200   # @zabbix_server(bossanova.web.pri)
            server  fuusio          10.0.0.3:80     check weight 4 maxconn 200   # @zabbix_server(fuusio.web.pri)
  5. Setup a crontab entry to execute the zabbix_haproxy script every minute.  I use the following entry in /etc/crontab:
    */1 * * * * nobody zabbix_haproxy -c /etc/haproxy.cfg -u "http://irc-galleria.net/haproxy?stats;csv" -C foo:bar -s [ip of my zabbix server]
  6. All set! Go and check the latests data in zabbix to see if you got the values. If you have problems you can use -v and -d command line arguments to print debugging information.

Open BigPipe javascript implementation

We have released our open BigPipe implementation written for IRC-Galleria which is implemented by loosely following this facebook blog. The sources are located at github: https://github.com/garo/bigpipe and there’s an example demonstrating the library in action at http://www.juhonkoti.net/bigpipe.

BigPipe allows speeding up page rendering times by loading the page in small parts called pagelets. This allows browser to start rendering the page while the php server is still processing to finish the rest. This transforms the traditional page rendering cycle into a streaming pipeline containing the following steps:

  1. Browser requests the page from server
  2. Server quickly renders a page skeleton containing the <head> tags and a body with empty div elements which act as containers to the pagelets. The HTTP connection to the browser stays open as the page is not yet finished.
  3. Browser will start downloading the bigpipe.js file and after that it’ll start rendering the page
  4. The PHP server process is still executing and its building each pagelet at a time. Once a pagelet  has been completed it’s results are sent to the browser inside a <script>BigPipe.onArrive(…)</script> tag.
  5. Browser injects the html code received into the correct place. If the pagelet needs any CSS resources those are also downloaded.
  6. After all pagelets have been received the browser starts to load all external javascript files needed by those pagelets.
  7. After javascripts are downloaded browser executes all inline javascripts.

There’s an usage example in example.php. Take a good look on it. The example uses a lot of whitespace padding to saturate web server and browser caches so that the bigpipe loading effect is clearly visible. Of course these paddings are not required in real usage. There’s still some optimizations to be done and the implementation is way from being perfect, but that hasn’t stopped us from using this in production.

Files included:

  • bigpipe.js Main javascript file
  • h_bigpipe.inc BigPipe class php file
  • h_pagelet.inc Pagelet class php file
  • example.php Example showing how to use bigpipe
  • test.js Support file for example
  • test2.js Support file for example
  • README
  • Browser.php Browser detection library by Chris Schuld (http://chrisschuld.com/)
  • prototype.js Prototypejs.org library
  • prototypepatch.js Patches for prototype

Eroon firefoxin tahmaisuudesta

Varsinkin viimeaikoina on puhuttu Firefoxin muistinkäyttöongelmista ja miten niitä on parannettu tulevaan kolmosversioon, mutta harvemmin puhutaan Firefoxin tahmaisuudesta, mikä on ainakin itseäni raivostuttanut huomattavasti (muistai itselläni riittää, joten se ei ole koskaan ollut ongelma). Tajusin, että sivuilla olevat Flash-mainokset voisivat aiheuttaa tätä tahmaisuutta ja asensin kokeeksi koneeseeni Flashblockin ja hups, tahmaisuus on tiessään!

Itselläni ei ole mitään mainoksia vastaan, jos ei lasketa muutamia Flash-mainoksia jotka soittavat ääntä ilman lupaa. Onneksi mainosala on pyrkinyt minimoimaan nämä, sillä liian ärsyttävät mainokset saavat käyttäjät asentamaan mainosblokkausohjelmia. Moni surffaaja unohtaa sivustojen pääasiallisen tulonlähteen olevan mainokset. Ilman mainoksia ei sivun ylläpitäjät saa tuloja ja ilman tuloja ei tule sisältöä! Itse en suosittele kenellekkään AdBlockin yms mainostenpoisto-pluginin hankkimista, sillä mainokset ovat pieni paha suhteessa hyvien sivujen sisältöön, mutta surffauskokemustani ne ei silti saa häiritä.

Ensimmäinen tilaukseni Amazon-kirjakaupasta

Jokainen netissä vähänkään liikkunut tietää eBayn ja Amazonin (UK), mutta ainakaan itse en ole näitä käyttänyt, ennen kuin nyt. Olen jo pitkään etsinyt Davig Brinin Startide Rising (suom. Tähtisumu Täytyy) -kirjaa englanniksi. Itselläni on suomennettu versio, mutta olen kaivannut sitä alkuperäisellä kielellä (ja suomenkielinen nide on lainassa siskollani) – vaikka olen lukenut kirjan jo ainakin kymmeneen kertaan.

Isäni kirja-david-brinn-startide-risingtilasi saman kirjasarjan ensimmäisen kirjan (David Brin – Sundiver) Suomalaisesta Kirjakaupasta, mutta lupasivat sille yli kuuden viikon toimitusajan, eikä muita sarjan kirjoja saanut heille edes tilaamalla. Amazonista löysin Startide Risining käytettynä erinomaisessa kunnossa muutaman euron hintaan ja David Brinin Brightness Reef (Uplift) uutena myöskin noin kahdeksan euron hintaan. Eipä ole hinnalla pilattu. Startide Rising saapui juuri postiluukusta viidentenä arkipäivänä tilauksen tekemisestä, mutta Brightness Reef:iä joutuu Amazonin mukaan odottamaan todennäköisesti yli joulun, ainakin heidän lähettämän sähköpostin perusteella. Ei haittaa minua, sillä en tilannutkaan noita lahjaksi vain itselleni.

Koko tilauksen tekemiseen meni noin 10 minuuttia ja rahat menevät kätevästi visalla. Helppoa!

Ylen sivustot kehityksen kärkijoukossa

Olen jo pitkän aikaa ihaillut YLE:n kykyä uudistaa Internet-palveluitansa. Mobiilisivut, RSS-syötteet, Yle-Areena (joka tosin on mielestäni toteutettu väärällä formaatilla) ja viimeisimpänä Delicious, Digg ja Facebook-linkit ovat jokainen olleet mielestäni fiksuja ja ennenkaikkea pirteitä päätöksiä muuten kankealta ja byrokraattiselta organisaatiolta.

yle-blogi

Viimeisimpänä YLE uudisti sivustojensa ulkoasua, mikä näkyi itselleni heti yle.fi/uutiset -sivuston yläreunaan ilmestyneenä räikeänä navigointipalkkina. YLE kuitenkin osoittaa jälleen olevansa ajan hermoilla ja ilmoittaa, että kehittäjät ottavat vastaan kommentteja YLE:n blogissa.

Jätin palautetta blogiin ja sainkin hyvän ja rakentavan vastauksen heti seuraavana päivänä blogin kommentteihin ja vielä kopion sähköpostiini, että varmasti luen vastauksen. Loistavaa toimintaa, YLE! Vielä kun organisaationne hallinto saataisiin samalle tasolle!