Snapshot recovery problems with MongoDB, mmap, XFS filesystem and rsync

I’m running a MongoDB 2.2 cluster in Amazon EC2 consisting of three machines. One of these machines is used to take hourly snapshots with LVM and EBS and I noticed a rare bug which leads to silent data corruption on the restore phase. I’m using Rightscale to configure the machines with my own ServerTemplate, which I enhance with some Rightscale Chef recipes for automated snapshots and restore. Rightscale needs to support multiple different platforms, where AWS is just one of them and they have carefully constructed these steps to perform the snapshot.

Each machine has two provisioned IO EBS volumes attached to the machine. The Rightscale block_device::setup_block_device creates an LVM volume group on top of these raw devices. Because EC2 can’t do atomic snapshot over multiple EBS volumes simultaneously, the LVM snapshots is used for this. So the backup steps are:

  1. Lock MongoDB from writes and flush journal file to disk to form a checkpoint with the db.fsyncLock() command.
  2. Lock the underlying XFS filesystem
  3. Do LVM snapshot
  4. Unlock XFS filesystem
  5. Unlock MongoDB with db.fsyncUnlock()
  6. Perform EBS snapshot for each underlying EBS volumes
  7. Delte the LVM snapshot, so that it doesn’t take disk space.

Notice that the main volume will start getting writes after step 5, before the EBS volumes have been snapshotted by Amazon EC2. This point is crucial when understanting the bug later. The restore procedure does the following steps in the block_device::do_primary_restore Chef recipe:

  1. Order EC2 to create new EBS volumes from each EBS snapshots and wait until the api says that the volumes have attached correctly
  2. Spin up the LVM
  3. Mount the snapshot first in read-write so that XFS can unroll the journal log and then remount it into read-only mode
  4. Mount the main data volume
  5. Use rsync to sync from the snapshot into the main data volume:  rsync -av –delete –inplace –no-whole-file /mnt/snapshot /mnt/storage
  6. Delete the LVM snapshot

Actual bug

MongoDB used mmap() sys-call to memory-map the data files from disk to memory. This makes the file layer implementation easier, but it creates other problems. Biggest issue is that the MongoDB daemon can’t know when the kernel flushes the writes to disk. This is also crucial information needed to understand this bug.

Rsync is very smart to optimize the comparison  and the sync. By default, rsync first looks at the file last modification time and size to determine if the file has changed. Only after it starts a sophisticated comparison function which sends the changed data over network. This makes it very fast to operate.

Now the devil of this bug comes from the kernel itself. It turns out that the kernel has a long lasting bug (dating way back to 2004!) where in some cases the mmap()’ed file mtime (last modification time) is not updated on sync when the kernel flushes writes to the disk, which uses XFS filesystem. Because of this, some of the data which mongodb writes after the LVM snapshot and before the EBS snapshot to the memory-map’ed data is flushed to the disk, but the file mtime is not updated.

Because the Rightscale restoration procedure uses rsync to sync the inconsistent main data volume from the consistent snapshot, the rsync will not notice that some of these files have been changed. Because of this, rsync in fact does not do a proper job to reconstruct the data volume and this results corrupted data.

When you try to start MongoDB from this kind of corrupted data, you will encounter some weird assertion errors like these:

Assertion: 10334:Invalid BSONObj size: -286331154 (0xEEEEEEEE) first element

and

ERROR: writer worker caught exception: BSONElement: bad type 72 on:

I first though that this was a bug in the MongoDB journal playback. The guys at 10gen were happy to assist me and after more careful digging I started to be more suspicious on the snapshot method itself. This required a quite lot of detective work by trial and error until I finally started to suspect the rsync phase in the restoration.

The kernel bug thread had a link to this program which replicated the actual bug in Linux and this confirmed that my system was still suffering from this very same bug:

[root@ip-10-78-10-22 tmp]# uname -a

Linux ip-10-78-10-22 2.6.18-308.16.1.el5.centos.plusxen #1 SMP Tue Oct 2
23:25:27 EDT 2012 x86_64 x86_64 x86_64 GNU/Linux

[root@ip-10-78-10-22 tmp]# dd if=/dev/urandom of=/mnt/storage/foo.txt
20595+0 records in
20594+0 records out
10544128 bytes (11 MB) copied, 1.75957 seconds, 6.0 MB/s

[root@ip-10-78-10-22 tmp]# /tmp/mmap-test /mnt/storage/foo.txt
Modifying /mnt/storage/foo.txt...
Flushing data using sync()...
Failure: time not changed.
Not modifying /mnt/storage/foo.txt...
Flushing data using msync()...
Success: time not changed.
Not modifying /mnt/storage/foo.txt...
Flushing data using fsync()...
Success: time not changed.
Modifying /mnt/storage/foo.txt...
Flushing data using msync()...
Failure: time not changed.
Modifying /mnt/storage/foo.txt...
Flushing data using fsync()...
Failure: time not changed.

Conclusions

I’m now working with both Rightscale and 10gen so that others won’t suffer from this bug. Mainly this means a few documentation tweaks on 10gen side and maybe a change of the backup procedurals on Rightscale side. Note that this bug does not happen unless you are snapshotting a database which uses mmap(). This means that at least MySQL and PostgreSQL are not affected.

This issue reminds that you should periodically test your backup methods by doing a restore and comparing that your data is intact. Debugging this strange bug took me for about a week. It contained all the classic pieces of a good detective story: false leads, dead ends, a sudden plot twist and a happy ending :)

Setting backup solution for my entire digital legacy (part 2 of 2)

As part of my LifeArchive project, I had to verify that I have sufficient methods to back all my valuable assets so well that they will last for decades. Sadly, there isn’t currently any mass media storage available that is known to function for such a long time, and in any way you must prepare for losing a site due to floods, fire and other disasters. This post explains how I solved my backup needs for my entire digital legacy. Be sure to read the first part: LifeArchive – store all your digital assets safely (part 1 of 2)

The cheapest way to store data currently is to use hard disks. Google, Facebook, The Internet Archive, Dropbox etc are all known to host big data centers with a lot of machine with a lot of disks. Also at least Google is known to use tapes for additional backups, but they are way too expensive for this kind of small usage.

Disks have also their own problem. The biggest problem is that they tend to break. Another problem is that they might corrupt your data, which is a problem with traditional raid systems. As I’m a big fan of ZFS, my choose was to build a SAN on top of it. You can read more on this process from this blog post: Cheap NAS with ZFS in HP MicroServer N40L

Backups

As keeping your eggs in one basked is just stupid, having a good and redundant backup solution is the key to success. As in my previous post, I concluded that using cloud providers to solely host your data isn’t wise, but they are a viable choice for doing backups. I’ve chosen to use CrashPlan, which is a really nice cloud based software for doing increment backups. Here are the cons and the pros for CrashPlan:

Pros:

  • Nice GUI for both backing up and restoring files
  • Robust. The backups will eventually complete and the service will notify you by email if something is broken
  • Supports Windows, OS X, Linux and Solaris / OpenIndiana
  • Infinitive storage on some of the plans
  • Does increment backups, so you can find the lost file from history.
  • Allows you to backup to both CrashPlan cloud and to your own storage if you run the client in multiple machines.
  • Allows you to backup to your friends machine (this doesn’t even cost you anything), so you can establish a backup ring with a few of your friends.

Cons:

  • It’s still a black-box service, which might break down when you least expect
  • CrashPlan cloud is not very fast: Upload rate to CrashPlan cloud is around 1Mbps and download (restore) around 5Mbps
  • You have to fully trust and rely on the CrashPlan client to work – there’s no another way to access the archive except using the client.

I setup the CrashPlan client to backup into its cloud and in addition to Kapsi Ry’s server where I’m running a copy of the CrashPlan client. Running your own client is easy and it gives me a much faster way to recover the data when I need to. As the data is encrypted, I don’t need to worry that there’s also a few thousand other users in the same server.

Another parallel backup solution

Even when CrashPlan feels like a really good service, I still didn’t want to trust solely to its services. I can always somehow forget to enter my new credit card number and let the data there expire, only to have a simultaneous fatal accident on my NAS. So that’s why I wanted to have a redundant backup method. I happen to get another used HP MicrosServer for a good bargain, so I setup it similarly to have three 1TB disks which I also happend to have laying around unused from my previous old NAS. Used gear, used disks, but they’re good enough to act as my secondary backup method. I will of course still receiver email notifications on disk failures and broken backups, so I’m well within my planning safety limits.

This secondary NAS lives at another site and it’s connected with an openvpn network to the primary server in my home. It also doesn’t allow any incoming connections from anywhere outside, so it’s also quite safe. I setup a simple rsync script from my main NAS to sync all data to this secondary NAS. The rsync script uses –delete -option, so it will remove files which have been deleted from the primary NAS. Because of this I also use a crontab entry to snapshot the backup each night. This will protect me if I accidentally delete files from the main archive. I keep a week worth of daily snapshots and a few month of weekly snapshots.

One best pros with this when comparing to CrashPlan is that the files are sitting directly on your filesystem. There’s no encryption nor any proprietary client and tools you need to rely, so you can safely assume that you can always get an access to your files.

There’s also another option: Get a few USB disks and setup a schema where you automatically copy your entire archive to one disk. Then every once in a while unplug one of those, put it somewhere safe and replace it with another. I might do something like this once a year.

Verifying backups and monitoring

“You don’t have backups unless you have proven you can restore from them.” – a well known truth that many people tend to forget. Rsync backups are easy to verify, just run the entire archive thru sha1sum on both sides and verify that the checksums match. CrashPlan is a different beast, because you need to restore the entire archive to another place and verify it from there. It’s doable, but currently it can’t be automated.

Monitoring is another thing. I’ve built all my scripts so that they will email me if there’s a problem, so I can react immediately on error. I’m planning to setup a Zabbix instance to keep track, but I haven’t yet bothered.

Conclusions

Currently most of our digital assets aren’t stored safely enough that you can count that they all will be available in the future. With this setup I’m confident that I can keep all my digital legacy safe from hardware failures, cracking and human mistakes. I admit that the overal solution isn’t simple, but it’s very well doable for an IT-savvy person. The problem is that currently you can’t buy this kind of setup anywhere as a service, because you can’t be 100% sure that the service will keep up in the upcoming decades.

This setup will also work as a personal cloud, assuming that your internet link is fast enough. With the VPN connections, I can also let my family members to connect into this archive and let them store their valuable data. This is very handy, because that way I will know that I can access my parents digital legacy, who probably can’t do all this by themselves alone.

LifeArchive – store all your digital assets safely (part 1 of 2)

Remember the moments when you, or your parents, found some really old pictures buried deep into some closet and you instantly get a warm and fuzzy feeling of memories? In this modern era of Cloud Services, we’re producing even more personal data which we want to retain. Pictures form your phone and your DSLR camera, documents you’ve made, non-drm games, movies and music you’ve bought etc. The list goes on and on. Todays problem is that you have so many different devices, that it’s really hard to keep up where all your data is.

One solution is to rely on a number of cloud services: Dropbox, Google, Facebook, Flickr etc can all host your images and files, but can you really rely that your data is still there after ten years? What about 30 years? What if you use a paid service and for some reason you forget to upgrade your new credit card data and the service deletes all your data? What about the files which lay on a corner of your old laptop after you bought a new shiny computer? You can’t rely that the cloud providers you use are still in business for decades to come.

The solution? Implement your own strategy by backing up all your valuable digital assets. After thinking this for a few years I finally came up with my current solution for this problem: Gather all your digital assets into one place, so that they’re easy to backup. You can still use all your cloud services like Dropbox and Facebook, but just make sure that you do automatic backups from all these services into this central storage. This way there’s only one place which you need to backup and you can easily do backups to multiple different places just for extra precaution.

First identify what’s worth saving

  • I do photography, so that’s a bunch of .DNG and .JPG images in my Lightroom archive. I don’t photograph that much, so I can easily store them all, assuming that I remove the images which have failed so badly that there’s no imaginable situation where I would want those.
  • I also like doing movies. The raw footage takes too much space that it’s worth saving, so I only archive the project files and the final version. I store the raw footage in external drives which I don’t backup into this archive.
  • Pictures from my cell phone. There’s a ton of lovely images there which I want to save.
  • Emails, text messages from my phone, comments and messages from facebook.
  • Misc project files. Be it a 3D model, a source code file related to an experiment, drawings for my new home layout etc. I produce this kind of small stuff on weekly basis and I want to keep them for future reference and for the nostalgic value.
  • This blog and the backups related to it.

I calculated that I have currently about 250GB of this personal data, spanning over a decade. I’ve planned that I can just keep adding data to this central repository during my entire life and to always transfer it to new hardware when the old breaks. In other words, this will be my entire digital legacy.

Action plan:

  1. Buy a good NAS to home
  2. Build bunch of scripts and automation to fetch all data from different cloud services to this nas
  3. Implement good backup procedures for this NAS.

The first step was quite easy. I bought a HP MicroServer, which acts as a NAS in my home. You can read more from this project from this other blog post. Second step is the most complex: I have multiple computers, an Android cell phone and a few cloud services where I have data that I want to save. I had to find existing solutions for each of these and build my own when I couldn’t find anything. The third step is easy, but it’s worth for another blog post next week.

Archive pictures, edited videos and other projects

I can access the NAS directly from my workstations via Samba/CIFS mounts over network, so I use it directly to host my Lightroom archive, edited video projects (not including raw video assets), and other project files which I tend to produce. I also use it to store drm free music, videos and ebooks which I’ve bought from internet.

Backing up Android phones

This includes pictures which I take with my phone, but also raw data and settings for applications. I found out about this nice program called Rsync for Android. It uses rsync with ssh keys to sync into a backup destination, which runs inside a OpenIndiana Zone in my NAS. Data destination dir is mounted into the zone via lofs, so that only the specific data directory is exposed to the zone. Then I use Llama to periodically run the backup.

In addition I use SMS Backup + to sync all sms and mms messages to GMail under a special “SMS” label. Works like charm!

Backing up GMail

gmvault does the trick. It uses IMAP to download new emails from GMail and it’s simple to setup.

I actually use two different instance of gmvault. They both sync my gmail account, but other deletes emails from the backup database which have been deleted from the gmail and other does not. The idea is that I can still restore my emails if somebody gains access to my gmail and deletes my all emails. I have one script in my cron that syncs the backup databases every night with the “-t quick” option.

Backup other servers

I have a few other servers, like the one where I host this blog, that needs to be backed up. I use simple rsync with ssh keys from cron, which backs up these every night. The rsync uses –backup and –backup-dir to retain some direct protection for deleted files.

Conclusions

This kind of central storage for all your digital assets needs some careful planning, but it’s an idea worth exploring. After you have established this kind of archive, you need to implement the backups, which I will talk in the next post.

This kind of archive solves the problem where you aren’t sure where all your files are – they either have a copy in the archive, or they don’t exists. Beside that, you can make some really entertaining discoveries when you crawl the helms of the archive and find some files you thought you had lost a decade ago.

Read the second part of this blog series at Setting backup solution for my entire digital legacy (part 2 of 2)

Cheap NAS with ZFS in HP MicroServer N40L

I’ve ran Solaris / OpenIndiana machines in my home for years and I just recently had to get a new one because my old server with 12 disk slots made way too much noise and consumed way too much power to my taste. Luckily hard disk sizes have grown up a big time and I could replace the old server with a smaller one and with smaller amount of disks.
hp-microserver

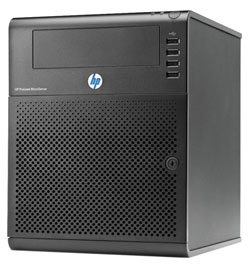
I only recently learn about the HP MicroServer product family. HP has been making these small little servers for a few years and they are really handy and really cheap for their features. I bought a HP MicroServer N40L from amazon.de, which shipped from Germany to Finland in just a week for just 242 euros. Here’s a quick summary about the server itself:

  • It’s small, quiet and doesn’t use a lot of power. According to some measurements it will use on average around 40 to 60W.
  • It has four 3.5″ non-hot-swap disk slots inside. In addition, it has eSATA on the back and a 5.25″ slot with SATA cable. These can give you two extra sata slots for total of six disks.
  • A dual core AMD Turion II Neo N40L (1.5 Ghz) processor. More than enough for a storage server.
  • It can fit two ECC dimms, totaling maximum of 8 GB memory. According to some rumors, you can fit it with two 8GB dimms to get total of 16 GB.
  • Seven USB:s. Two on the back, four on the front and one inside the chassis, soldered right into the motherboard.
  • Depending on disks and configuration, it can stretch up to 12 TB of usable disk space (assuming you install five 4TB disks) with still providing enough security to handle two simultaneous disk failures!

The machine doesn’t have any RAID features, which doesn’t mind me, because my choice of weapon was to install OpenIndiana which comes with the great ZFS filesystem, among other interesting features. If you are familiar with Linux, you can easily learn how to manage an OpenIndiana installation, it’s really easy. ZFS itself is a powerful modern filesystem which combines the best features of software raid, security, data integrity and easy administration. OpenIndiana allows you to share the space with Samba/CIFS to Windows and with AppleTalk to your Macintosh. It also supports exporting volumes with iSCSI, it provides filesystem backups with ZFS snapshots and it even can be used as storage for your Macintosh Time Machine backups. You can read more about ZFS from the Wikipedia entry.

There’s a few different product packages available: I picked the one which comes with one 4GB ECC DIMM, DVD drive and no disks. There’s at least one other package which comes with one 2GB ECC DIMM and one 250GB disk. I personally suggest the following setup where you install the operating system into a small SSD and use the spinning disks only for the data storage.

Shopping list:

  • HP MicroServer N40L with one 4GB ECC DIMM and no disks.
  • Some 60GB SSD disk for operating system. I bought a Kingston 60GB for 60 euros.
  • Three large disks. I had 2TB Hitachi drives on my shelf which I used.
  • One USB memory stick, at least 1GB and an USB keyboard. You need these only during installation.

Quick installation instructions

– First optional step: You can flash a new modified bios firmware which allows getting better performance out of the SSD disk. The instructions are available in this forum thread and in here. Please read the instructions carefully. Flashing BIOS firmware is always a bit dangerous and it might brick your MicroServer, so consider yourself warned.

– Replace the DVD drive with the SSD disk. You can use good tape to attach the SSD disk to the chassis.

– Download the newest OpenIndiana server distribution from http://openindiana.org/download/#text and install it into the USB stick with these instructions.

– Insert the USB stick with OpenIndiana into the MicroServer and boot the machine. During the setup you can change how the SSD disk is partitioned for the OS: I changed the default settings so that the OS partition was just 30GB. This is more than enough for the basic OS. My plan is to later experiment with a 25GB slice as an L2ARC cache partition for the data disks and to leave 5GB unprovisioned. This extra 5GB should give the SSD controller even more room to manage the SSD efficiently and giving it more life time without wearing out. This might sound like a bit of exaggeration, but I’m aiming to minimize the required maintenance with sacrificing some disk space.

– After installation shutdown the server, remove the USB stick and install your data disks. My choise was to use three 2TB disks in a mirrored pool. This means that I can lose two disks at the same time, giving me a good time margin to replace the failed drive. You can read some reasoning why I wanted to have triple way mirroring from this article. If you populate the drive slots from left to right, the leftmost drive will be c4t0d0, the second-from-the-left c4t1d0 etc. The exact command should be:

zpool create tank mirror c4t0d0 c4t1d0 c4t2d0

After this the system should look like this:

  
# zpool status
pool: tank
state: ONLINE
config:

        NAME        STATE     READ WRITE CKSUM
        tank        ONLINE       0     0     0
          mirror-0  ONLINE       0     0     0
            c4t0d0  ONLINE       0     0     0
            c4t1d0  ONLINE       0     0     0
            c4t2d0  ONLINE       0     0     0

Now you can create a child filesystems under the /tank storage pool to suit your needs:

# zfs create tank/lifearchive
# zfs create tank/crashplan_backups
# zfs list
NAME                     USED  AVAIL  REFER  MOUNTPOINT
tank                     393G  1.40T    35K  /tank
tank/crashplan_backups  18.8G  1.40T  18.8G  /tank/crashplan_backups
tank/lifearchive         133G  1.40T   133G  /tank/lifearchive

Here I created two filesystems: One for crashplan backups from other machines and other for storing all my important digital heritage. Next I wanted to export this filesystem to Windows via the Samba sharing system:

# zfs set "sharesmb=name=lifearchive" tank/lifearchive
echo "other password required pam_smb_passwd.so.1 nowarn" >> /etc/pam.conf

In addition I had to add this line to /etc/pam.conf and change my password with “passwd” command after adding that line. Now you should be able to browse the lifearchive filesystem from windows.

Few additional steps you probably want to do:

Now when you got your basic system working you can do a few tricks to get it to work even better. Before you continue, snapshot your current state as explained in the next chapter:

Snapshot your root filesystem

After you’ve done everything as you want you should snapshot this situation as a new boot environment. This way if you do something very stupid and you render your system unusable, you can always boot the machine to the snapshotted state. The command “beadm create -e openindiana openindiana-baseline” will do the trick. Read here what it actually does! Note that this does not cover your data pool, so you might also want to create some snapshot backup system for that. Googling for “zfs snapshot backup script” should get you started.

Email alerts

Verify that you can send email out from the box, so that you can get alerts if one of your disk breaks. You can try this with for example the command “mail your.email@gmail.com”. Type your email and press Ctrl-D to send the email. At least in gmail your email might end up in the spam folder. My choice was to install Postfix and configure it to relay emails via the Google SMTP gateway. The exact steps are beyond the scope of this article, but here’s few tips:

  1. First configure to use SFE repositories: http://wiki.openindiana.org/oi/Spec+Files+Extra+Repository
  2. Stop sendmail: “svcadm disable sendmail”
  3. Remove sendmail: “pkg uninstall sendmail”
  4. Install postfix with “pkg install postfix”
  5. Follow these steps http://carlton.oriley.net/blog/?p=31 – at least the PKI certificate part is confusing. You need to read some documentation around the net to get this part right.
  6. Configure the FMA system to send email alerts with these instructions. Here’s also some other instructions which I used.

Backup your data

I’ve chosen to use Crashplan to back up my data to the Crashplan cloud and to another server over the internet. In addition I use Crashplan to backup my workstation into this NAS – that’s what the /tank/crashplan_backups filesystem was for.

Periodic scrubbing for the zpool

ZFS has a nice feature called scrubbing: This operation will scan over all stored data and verify that each and every byte in each and every disk is stored correctly. This will alert you from a possible upcoming disk breakage when there’s yet no permanent damage. The command is “zpool scrub tank” where “tank” is the name of the zpool. You should setup a crontab operation to do this every week. Here’s one guide how to do it: http://www.nickebo.net/periodic-zpool-scrubbing/

Optimize nginx ssl termination cpu usage with cipher selection

I have a fairy typical setup where I have nginx in front of haproxy, where nginx is terminating the ssl connections from client browsers. As our product grew, my loadbalancer machines didn’t have enough CPU to do all the required ssl processing.

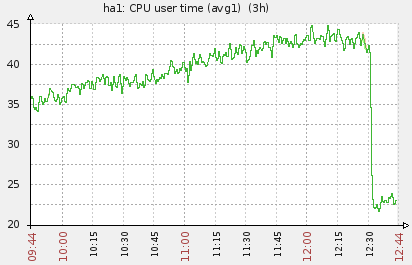
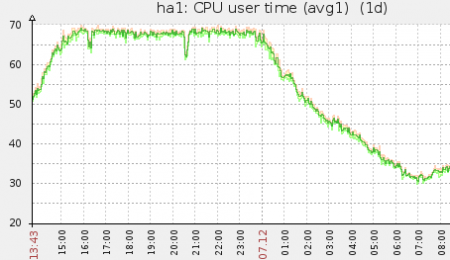
As this zabbix screenshot shows, the nginx takes more and more cpu, until it hits the limit of our AWS c1.xlarge instance. This causes delays for our users and some requests might even time out.

Luckily it turns out that there was a fairy easy way to solve this. nginx defaults, at least in our environment, into a cipher called DHE-RSA-AES256-SHA. This cipher uses Diffie-Hellman Ephemeral key exchange protocol, which uses a lot of CPU. With help from this and this blog posts I ended up with the following sollution:

First check if your server uses the slow DHE-RSA-AES256-SHA cipher:

openssl s_client -host your.host.com -port 443

Look for the following line:

Cipher    : DHE-RSA-AES256-SHA

This tells us that we can optimize the CPU usage by selecting faster cipher. Because I’m using AWS instances and these instances don’t support the AESNI (Hardware accelerated processor instructions for calculationg AES) I ened up with following cipher list (read more what this means from here):

RC4-SHA:AES128-SHA:AES:!ADH:!aNULL:!DH:!EDH:!eNULL

If your box can support AESNI you might want to prefer AES over RC4. It’s not the safest cipher choice out there, but more than good enough for our use. Check out this blog post for more information.

So, I added these two lines to my nginx.conf

ssl_ciphers RC4-SHA:AES128-SHA:AES:!ADH:!aNULL:!DH:!EDH:!eNULL;
ssl_prefer_server_ciphers on;

After restarting nginx you should verify that the correct cipher is now selected by running the openssl s_client command again. In my case it now says:

Cipher    : RC4-SHA

All done! My CPU load graphs also shows a clear performance boost. Nice and easy victory.


Change terminal title in os x

If you’re like me, you’ll have a terminal with dozen or so tabs open and you can’t remember which tab was which. The problem is even more annoying when you have some programs running on each tab and you can’t differentiate them.

By adding this oneliner to your ~/.bash_profile you can set the title for your terminal:

function title() { echo -n -e "\033]0;$@\007"; }

Just type “title something” and the title will change. Note that you need to apply the file by typing “. ~/.bash_profile” or by reopening the tab.

Why Open-sourcing Components Increases Company Productivity and Product Quality

We’re big fans of open source community here at Applifier. So much, that we believe that open-sourcing software components and tools developed in-house will result in better quality, increased cost savings and increased productivity. Here’s why:

We encourage our programmers to design and implement components, which aren’t our core business, into reusable packages which will be open-sourced once the package is ready. The software is distributed on our GitHub site, with credits to each individual who contributed into the software.

Because the programmers know that their full name will be printed all over the source code, and they can be later Google’d with it, they will take better care to ensure that the quality standards are high enough to stand a closer look. This means:

  • Better overall code quality. Good function/parameter names, good packages, no unused functions etc.
  • Better modularization. The component doesn’t have as much dependencies to other systems, which is generally considered as a good coding practice.
  • Better tests and test coverage. Tests are considered to be essential part of modern code development, so you’ll want to show everybody that you know your business, right?
  • Better documentation. The component is published so that anybody can use it, so it must have good documentation and usage instructions.
  • Better backwards compatibility. Coders take better care when they design API’s and interfaces because they know that somebody might be using the component somewhere out there.
  • Better security. Coder knows that anybody will be able to read his code and find security holes, thus he takes better care for not making any.

In practice, we have found that all the open source components have higher code and document quality than any of our non-published software component. This also ensures that the components are well documented and can be easily maintained if the original coders leave the company. This gives good cost savings in the long run. Open-sourcing components also gives your company good PR value and makes you more attractive for future employers.

For example one of our new guy was asked to do a small monitoring component to monitor some data from RightScale and transfer it into Zabbix, which is our monitoring system. Once the person said that the component was completed, I said to him: “Good, now polish it so that you dare to publish it with your own name in GitHub.”

Adding new storage tank with diskmap.py.

We recently added a bunch of Western Digital 3.0TB Green drives to the enclosure, so that we can run a bunch of tests with this brand. Here’s a quick recap what I had to do to make these new disks online.

First run the diskmap.py. the bold lines are my commands which I wrote. First I discover for new drives (it might that the diskmap shows an old cache without the new drivers) and then I ask it to lisk all disks.

root@openindiana:/export/home/garo# diskmap.py
Diskmap - openindiana> discover
Diskmap - openindiana> disks
0:02:00 c2t5000C5003EF23025d0 ST33000651AS 3.0T Ready (RDY) tank: raidz3-0
0:02:01 c2t5000C5003EEE6655d0 ST33000651AS 3.0T Ready (RDY) tank: raidz3-0
0:02:02 c2t5000C5003EE17259d0 ST33000651AS 3.0T Ready (RDY) tank: raidz3-0
0:02:03 c2t5000C5003EE16F53d0 ST33000651AS 3.0T Ready (RDY) tank: raidz3-0
0:02:04 c2t5000C5003EE5D5DCd0 ST33000651AS 3.0T Ready (RDY) tank: raidz3-0
0:02:05 c2t5000C5003EE6F70Bd0 ST33000651AS 3.0T Ready (RDY) tank: raidz3-0
0:02:06 c2t5000C5003EEF8E58d0 ST33000651AS 3.0T Ready (RDY) tank: raidz3-0
0:02:07 c2t5000C5003EF0EBB8d0 ST33000651AS 3.0T Ready (RDY) tank: raidz3-0
0:02:08 c2t5000C5003EF0F507d0 ST33000651AS 3.0T Ready (RDY) tank: raidz3-0
0:02:09 c2t5000C5003EECE68Ad0 ST33000651AS 3.0T Ready (RDY) tank: raidz3-0
0:02:10 c2t5000C5003EF2D1D0d0 ST33000651AS 3.0T Ready (RDY) tank: spares
0:02:12 c2t5000C5003EEEBC8Cd0 ST33000651AS 3.0T Ready (RDY) tank: spares
0:02:13 c2t5000C5003EE49672d0 ST33000651AS 3.0T Ready (RDY) tank: spares
0:02:14 c2t5000C5003EEE7F2Ad0 ST33000651AS 3.0T Ready (RDY) tank: raidz3-0
0:02:15 c2t5000C5003EED65BBd0 ST33000651AS 3.0T Ready (RDY)
0:03:10 c2t50014EE2B1158E58d0 WDC WD30EZRX-00M 3.0T Ready (RDY)
0:03:11 c2t50014EE2B11052C3d0 WDC WD30EZRX-00M 3.0T Ready (RDY)
0:03:12 c2t50014EE25B963A7Ed0 WDC WD30EZRX-00M 3.0T Ready (RDY)
0:03:13 c2t50014EE2B1101488d0 WDC WD30EZRX-00M 3.0T Ready (RDY)
0:03:14 c2t50014EE2B0EBFF8Ad0 WDC WD30EZRX-00M 3.0T Ready (RDY)
0:03:15 c2t50014EE25BBB4F91d0 WDC WD30EZRX-00M 3.0T Ready (RDY)
0:03:16 c2t50014EE2066AB19Fd0 WDC WD30EZRX-00M 3.0T Ready (RDY)
0:03:17 c2t50014EE25BBFCAB0d0 WDC WD30EZRX-00M 3.0T Ready (RDY)
0:03:18 c2t50014EE2066686C6d0 WDC WD30EZRX-00M 3.0T Ready (RDY)
0:03:19 c2t50014EE2B1158F6Fd0 WDC WD30EZRX-00M 3.0T Ready (RDY)
0:03:20 c2t50014EE2B0E99EA1d0 WDC WD30EZRX-00M 3.0T Ready (RDY)
1:01:00 c2t50015179596901EBd0 INTEL SSDSA2CT04 40.0G Ready (RDY) rpool: mirror-0
1:01:01 c2t50015179596A488Cd0 INTEL SSDSA2CT04 40.0G Ready (RDY) rpool: mirror-0
Drives : 28 Total Capacity : 78.1T
Diskmap - openindiana>

I colored the new disk ids with yellow for your reading pleasure. Next I copied all those 11 ids and I formed the following command, which creates a new tank. I also reused the three old spares, those disk ids are marked with green

zpool create tank2 raidz3 c2t50014EE2B1158E58d0 ... c2t5000C5003EE49672d0 spares c2t5000C5003EF2D1D0d0 c2t5000C5003EEEBC8Cd0 c2t5000C5003EE49672d0

All set! I could now access the new 30TB volume under /tank2.

Building a 85TB cheap storage server with Solaris OpenIndiana

I just recently built a storage server based on Solaris OpenIndiana, a 2U SuperMicro server and a SuperMicro 45 disk JBOD rack enclosure. The current configuration can host 84 TB of usable disk space, but we plan to extend this at least to 200TB in the following months. This blog entry describes the configuration and steps how to implement such beast by yourself.

Goal:

  • Build a cheap storage system capable of hosting 200TB of disk space.
  • System will be used to archive data (around 25 GB per item) which is written once and then accessed infrequently (once every month or so).
  • System must be tolerant to disk failures, hence I preferred raidz3 which can handle a failure of three disks simultaneously.
  • The capacity can be extended incrementally by buying more disks and more enclosures.
  • Each volume must be at least 20TB, but doesn’t have to be necessarily bigger than that.
  • Option to add a 10GB Ethernet card in the future.
  • Broken disks must be able to identify easily with a blinking led.

I choose to deploy an OpenIndiana based system which uses SuperMicro enclosures to host cheap 3TB disks. Total cost of the hardware with one enclosure was around 6600 EUR (2011 Dec prices) without disks. Storing 85TB would cost additional 14000 EUR with current very expensive (after the Thailand floods) disk prices. Half a year ago the the same disks would have been about half of that. Disks would be deployed in a 11-disk raidz3 sets, one or two per zpool. This gives us about 21.5TB per 11 disk set. New storage is added as a new zpool instead of attaching it to an old zpool.

Parts used:

  • The host is based on a Supermicro X8DTH-6F server motherboard with two Intel Xeon E5620 4-core 2.4 Ghz CPUs and 48 GB of memory. Our workload didn’t need more memory, but one could easily add more.
  • Currently one SC847E16-RJBOD1 enclosure. This densely packed 4U chassis can fit a whopping 45 disks.
  • Each chassis is connected to a LSI Logic SAS 9205-8e HBA controller with two SAS cables. Each enclosure has two backplanes, so both backplanes are connected to the HBA with one cable.
  • Two 40GB Intel 320-series SSDs for the operating system.
  • Drives from two different vendor so that we can have some benchmarks and tests before we commit to the 200TB upgrade:
    • 3TB Seagate Barracuda XT 7200.12 ST33000651AS disks
    • Western Digital Caviar Green 3TB disks

It’s worth to note that this system is built for storing large amounts of data which are not frequently accessed. We could easily add SSD disks as L2ARC caches and even a separated ZIL (for example the 8 GB STEC ZeusRAM DRAM, which costs around 2200 EUR) if we would need faster performance for example database usage. We selected disks from two different vendors for additional testing. One zpool will use only disks of a single type. At least the WD Green drives needs a firmware modification so that they don’t park their heads all the time.

Installation:

OpenIndiana installation is easy: Create a bootable CD or a bootable USB and boot the machine with just the root devices attached. The installation is very simple and takes around 10 minutes. Just select that you install the system to one of your SSDs with standard disk layout. After your installation is completed and you have booted the system, follow these steps to make the another ssd bootable.

Then setup some disk utils under /usr/sbin. You will need these utils to for example identify the physical location of a broken disk in the enclosure. (read more here):

Now it’s time to connect your enclosure to the system with the SAS cables and boot it. OpenIndiana should recognize the new storage disks automatically. Use the diskmap.py to get a list of the disk identifies for later zpool create usage:

garo@openindiana:/tank$ diskmap.py
Diskmap - openindiana> disks
0:02:00 c2t5000C5003EF23025d0 ST33000651AS 3.0T Ready (RDY)
0:02:01 c2t5000C5003EEE6655d0 ST33000651AS 3.0T Ready (RDY)
0:02:02 c2t5000C5003EE17259d0 ST33000651AS 3.0T Ready (RDY)
0:02:03 c2t5000C5003EE16F53d0 ST33000651AS 3.0T Ready (RDY)
0:02:04 c2t5000C5003EE5D5DCd0 ST33000651AS 3.0T Ready (RDY)
0:02:05 c2t5000C5003EE6F70Bd0 ST33000651AS 3.0T Ready (RDY)
0:02:06 c2t5000C5003EEF8E58d0 ST33000651AS 3.0T Ready (RDY)
0:02:07 c2t5000C5003EF0EBB8d0 ST33000651AS 3.0T Ready (RDY)
0:02:08 c2t5000C5003EF0F507d0 ST33000651AS 3.0T Ready (RDY)
0:02:09 c2t5000C5003EECE68Ad0 ST33000651AS 3.0T Ready (RDY)
0:02:11 c2t5000C5003EF2D1D0d0 ST33000651AS 3.0T Ready (RDY)
0:02:12 c2t5000C5003EEEBC8Cd0 ST33000651AS 3.0T Ready (RDY)
0:02:13 c2t5000C5003EE49672d0 ST33000651AS 3.0T Ready (RDY)
0:02:14 c2t5000C5003EEE7F2Ad0 ST33000651AS 3.0T Ready (RDY)
0:03:20 c2t5000C5003EED65BBd0 ST33000651AS 3.0T Ready (RDY)
1:01:00 c2t50015179596901EBd0 INTEL SSDSA2CT04 40.0G Ready (RDY) rpool: mirror-0
1:01:01 c2t50015179596A488Cd0 INTEL SSDSA2CT04 40.0G Ready (RDY) rpool: mirror-0
Drives : 17 Total Capacity : 45.1T

Here we have total of 15 disks. We’ll use 11 of them to for a raidz3 stripe. It’s important to have the correct amount of drivers in your raidz configurations to get optimal performance with the 4K disks. I just simply selected the first 11 disks (c2t5000C5003EF23025d0, c2t5000C5003EEE6655d0, … , c2t5000C5003EF2D1D0d0) and created a new zpool with them and also added three spares for the zpool:

zpool create tank raidz3 c2t5000C5003EF23025d0, c2t5000C5003EEE6655d0, ... , c2t5000C5003EF2D1D0d0
zpool add tank spare c2t5000C5003EF2D1D0d0 c2t5000C5003EEEBC8Cd0 c2t5000C5003EE49672d0

This resulted in a nice big tank:

        NAME                       STATE     READ WRITE CKSUM
        tank                       ONLINE       0     0     0
          raidz3-0                 ONLINE       0     0     0
            c2t5000C5003EF23025d0  ONLINE       0     0     0
            c2t5000C5003EEE6655d0  ONLINE       0     0     0
            c2t5000C5003EE17259d0  ONLINE       0     0     0
            c2t5000C5003EE16F53d0  ONLINE       0     0     0
            c2t5000C5003EE5D5DCd0  ONLINE       0     0     0
            c2t5000C5003EE6F70Bd0  ONLINE       0     0     0
            c2t5000C5003EEF8E58d0  ONLINE       0     0     0
            c2t5000C5003EF0EBB8d0  ONLINE       0     0     0
            c2t5000C5003EF0F507d0  ONLINE       0     0     0
            c2t5000C5003EECE68Ad0  ONLINE       0     0     0
            c2t5000C5003EEE7F2Ad0  ONLINE       0     0     0
        spares
          c2t5000C5003EF2D1D0d0    AVAIL
          c2t5000C5003EEEBC8Cd0    AVAIL
          c2t5000C5003EE49672d0    AVAIL

Setup email alerts:

OpenIndiana will have a default sendmail configuration which can send email to the internet via directly connecting to the destination mail port. Edit your /etc/aliases to add a meaningful destination for your root account and type newaliases after you have done your editing. Then follow this guide and setup email alerts to get notified when you lose a disk.

Snapshot current setup as a boot environment:

OpenIndiana boot environments allows you to snapshot your current system as a backup, so that you can always reboot your system to a known working state. This is really handy when you do system upgrades, or experiment with something new. beadm list shows the default boot environment:

root@openindiana:/home/garo# beadm list
BE Active Mountpoint Space Policy Created
openindiana NR / 1.59G static 2012-01-02 11:57
There we can see our default openindiana boot environment, which is both active (N) and will be activated upon next reboot (R). The command beadm create -e openindiana openindiana-baseline will snapshot the current environment into new openindiana-baseline which acts as a backup. This blog post at c0t0d0s0 as a lot of additional information how to use the beadm tool.

What to do when a disk fails?

The failure detection system will email you a message when the zfs system detects a problem with system. Here’s an example of the results when we removed a disk on the fly:

Subject: Fault Management Event: openindiana:ZFS-8000-D3
SUNW-MSG-ID: ZFS-8000-D3, TYPE: Fault, VER: 1, SEVERITY: Major
EVENT-TIME: Mon Jan 2 14:52:48 EET 2012
PLATFORM: X8DTH-i-6-iF-6F, CSN: 1234567890, HOSTNAME: openindiana
SOURCE: zfs-diagnosis, REV: 1.0
EVENT-ID: 475fe76a-9410-e3e5-8caa-dfdb3ec83b3b
DESC: A ZFS device failed. Refer to http://sun.com/msg/ZFS-8000-D3 for more information.
AUTO-RESPONSE: No automated response will occur.
IMPACT: Fault tolerance of the pool may be compromised.
REC-ACTION: Run ‘zpool status -x’ and replace the bad device.

Log into the machine and execute zpool status to get detailed explanation which disk has been broken. You should also see that a spare disk has been activated. Look up the disk id (c2t5000C5003EEE7F2Ad0 in this case) from the print.

        NAME                       STATE     READ WRITE CKSUM
        tank                       ONLINE       0     0     0
          raidz3-0                 ONLINE       0     0     0
            c2t5000C5003EF23025d0  ONLINE       0     0     0
            c2t5000C5003EEE6655d0  ONLINE       0     0     0
            c2t5000C5003EE17259d0  ONLINE       0     0     0
            c2t5000C5003EE16F53d0  ONLINE       0     0     0
            c2t5000C5003EE5D5DCd0  ONLINE       0     0     0
            c2t5000C5003EE6F70Bd0  ONLINE       0     0     0
            c2t5000C5003EEF8E58d0  ONLINE       0     0     0
            c2t5000C5003EF0EBB8d0  ONLINE       0     0     0
            c2t5000C5003EF0F507d0  ONLINE       0     0     0
            c2t5000C5003EECE68Ad0  ONLINE       0     0     0
            spare-10
              c2t5000C5003EEE7F2Ad0  UNAVAIL       0     0     0  cannot open
              c2t5000C5003EF2D1D0d0 ONLINE       0     0     0 132GB resilvered
        spares
          c2t5000C5003EF2D1D0d0    INUSE     currently in use
          c2t5000C5003EEEBC8Cd0    AVAIL
          c2t5000C5003EE49672d0    AVAIL

Start the diskmap.py and execute command “ledon c2t5000C5003EEE7F2Ad0″. You should now see a blinking red led on the broken disk. You should also try to unconfigure the disk first via cfgadm: Type cfgadm -al to get a list of your configurable devices. You should find your faulted disk from a line like this:

c8::w5000c5003eee7f2a,0        disk-path    connected    configured   unknown

Notice that our disk id in zpool status was c2t5000C5003EEE7F2Ad0, so it will show in the cfgadm print as “c8::w5000c5003eee7f2a,0″. Now try and type cfgadm -c unconfigure c8::w5000c5003eee7f2a,0 I’m not really sure is this part needed, but our friends at #openindiana irc channel recommended doing this.

Now remove the physical disk which is blinking the red led and plug a new drive back. OpenIndiana should recognize the disk automatically. You can verify this by running dmesg:

genunix: [ID 936769 kern.info] sd17 is /scsi_vhci/disk@g5000c5003eed65bb
genunix: [ID 408114 kern.info] /scsi_vhci/disk@g5000c5003eed65bb (sd17) online

Now start diskmap.py, run discover and then disks and you should see your new disk c2t5000C5003EED65BBd0. Now you need to replace the faulted device with thew new one: zpool replace tank  c2t5000C5003EEE7F2Ad0 c2t5000C5003EED65BBd0. The zpool should now start resilvering the new replacement disk. The spare disk is still attached and must be manually removed after the resilvering is completed: zpool detach tank  c2t5000C5003EF2D1D0d0. There’s more info and examples at the Oracle manuals which you should read.

As you noted, there’s a lot manual operations which needs to be done. Some of these can be automated and the rest can be scripted. Consult at least the zpool man page to know more.

Benchmarks:

Simple sequential read and write benchmark against a 11 disks raidz3 in a single stripe was done with dd if=/dev/zero of=/tank/test bs=4k and monitoring the performance with zpool iostat -v 5

Read performance with bs=4k: 500MB/s
Write performance with bs=4k: 450MB/s
Read performance with bs=128k: 900MB/s
Write performance with bs=128k: 600MB/s

I have not done any IOPS benchmarks, but knowing how the raidz3 works, the IOPS performance should be about the same than one single disk can do. The 3TB Seagate Barracuda XT 7200.12 ST33000651AS can do (depending on threads) 50 to 100 iops. CPU usage tops at about 20% during the sequential operations.

Future:

We’ll be running more tests, benchmarks and watch for general stability in the upcoming months. We’ll probably fill the first enclosure gradually in the new few months with total of 44 disks, resulting around 85TB of usable storage. Once this space runs out we’ll just buy another enclosure, another 9205-8e HBA controller and start filling that.

Update 2012-12-11:

It’s been almost a year after I built this machine to one of my clients and I have to say that I’m quite pleased with this thing. The system has now three tanks of storage, each is a raidz3 spanning over 11 disks. Nearly every disk has worked just fine so far, I think we’ve had just one disk crash during the year. The disk types reported with diskmap.py are “ST33000651AS” and “WDC WD30EZRX-00M”, all 3TB disks. The Linux client side has had a few kernel panics, but I have no idea if those are related to the nfs network stack or not.

One of my reader also posted a nice article at http://www.networkmonkey.de/emulex-fibrechannel-target-unter-solaris-11/ – be sure to check that out also.
 

SuperMicro JBOD SC847E16-RJBOD1 enclosure with Solaris OpenIndiana

I’ve just deployed a OpenIndiana storage system which uses a SuperMicro JBOD SC847E16-RJBOD1 45 disk enclosure and an LSI Logic SAS 9205-8e HBA controller with OpenIndiana (build 151a). This enclosure allows you to fit huge amount of storage into just 4U rack space.

There’s a great utility called sas2ircu. Together with diskmap.py, these allows you to:

  • Identify where your disks are in your enclosure
  • Toggle the disk locator identify led on and off.
  • Run a smartcl test

So I can now locate my faulted disk with a clear blinking red led so that I can replace it safely.

Installation: Copy both binaries to /usr/sbin and you’re ready to go. Try first running diskmap.py and execute the discover command. Then you can list your disks and their addresses in the enclosure by saying disks.

There’s also the great lsiutil tool available. You need to find the 1.63 version which supports the 9205-8e controller. Unfortunately for some reason LSI has not yet made this tool available on their site. You can download it in the mean time from here: http://www.juhonkoti.net/media/LSIUTIL-1.63.zip

Kindlen käyttö Suomessa

Kindle on Amazonin erinomainen sähköisten kirjojen lukulaite, jonka saa tilattua Suomeen Amazonin verkkokaupasta reilun sadan euron hintaan. Jenkkimatkalla Kindlen voi noutaa itselleen noin 70 euron hintaan. Kindle käyttää ns. sähköistä mustetta (eInk), jonka lukeminen vastaa erittäin hyvin paperilta lukemista. Koska näytössä ei ole taustavaloa, sen lukeminen ei rasita silmiä ja sen käyttö vie erittäin vähän sähköä. Kindlen akku kestääkin normaalissa käytössä helposti kuukauden. Kindlen kaveriksi kannattaa ostaa jonkinlainen suojakuori, jotta sen kantaminen mukana olisi huolettomampaa. Kindle ladataan kytkemällä se micro-USB -johdolla esimerkiksi tietokoneeseen.

Kindlessä on sisäänrakennettuna Englannin, Ranskan, Saksan, Italian, Portugalin ja Espanjan tietosanakirjat. Voit erittäin helposti tarkistaa lähes minkä tahansa sanan merkityksen lukiessasi mitä tahansa kirjaa. Tämä on erittäin kätevä, jos esimerkiksi jokin Englanninkielisen romaanin sana ei ole ennalta tuttu. Vaikka pidänkin Englannin kielen sanavarastoani kohtuullisena, tämä ominaisuus on ollut ahkerassa käytössä. Sanan hakeminen tapahtuu liikuttamalla kursori halutun sanan eteen, jolloin sanan selostus ilmestyy ruudun reunaan.

Näyttö on mustavalkoinen ja se sopii parhaiten romaanien lukemiseen. Muita sovelluskohteita on esimerkiksi tietokirjat, oppikirjat ja laitteiden manuaalit. Grafiikkaa sisältävät julkaisut ja sarjakuvat eivät ole Kindlen omininta aluetta. Kindlestä on saatavilla useita eri malleja: Näppäimistöllä tai ilman, kosketusnäytöllä tai ilman, 3G yhteydellä tai ilman. Itse olen ollut hyvin tyytyväinen kaikista halvimpaan malliin, jossa ei ole mitään edellämainituista.

  • Näppäimistö: Kindlen avulla voi tehdä muistiinpanoja, merkintöjä “sivujen marginaaleihin” ja hakea tekstiä kirjasta ja selata vaikka Wikipediaa. Kaikki onnistuu tarvittaessa myös näytöltä käytettävällä näppäimistöllä. Koska itse käytän Kindleä vain lukemiseen, en ole kaivannut fyysistä näppäimistöä.
  • Kosketusnäyttö: Helpottaa esimerkiksi on-screen -näppäimistön käyttöä, mutta toisaalta täyttää näytön sormenjäljillä. En ole kaivannut.
  • 3G-yhteys: Kindlen saa (lähes) ilmaiseksi ympäri maailman toimivalla 3G yhteydellä. Kindlen avulla voi ostaa kirjoja suoraan Amazonin verkkokaupasta, eikä näiden lataamisesta Kindleen tarvitse maksaa tiedonsiirtomaksua. Ainoastaan omien dokumenttien lataaminen sähköpostin välityksellä maksaa jonkin verran. Jos sinulla on mahdollisuus käyttää WLANia esimerkiksi puhelimen kautta, et tarvitse tätä.
  • Mainokset: Jenkeistä ostamalla voi valita muutaman kymmenen dollarin halvemman version, joka näyttää laitteen ollessa poiskytkettynä jonkin satunnaisen mainoksen. Mainokset eivät haittaa lukemista, eikä niiden käyttö vähennä laitteen akunkestoa. Itse en ole kokenut mainoksia häiritseväksi ja ne sisältävät satunnaisesti ihan hyviä tarjouksia.
  • DX-versio: Kindlestä on olemassa myös huomattavasti isompi DX versio. Itse en ole tätä kaivannut, vaan romaanien lukeminen onnistuu hyvin normaalin Kindlen näytöltä. Voisin kuvitella, että isommasta näytöstä olisi hyötyä esimerkiksi PDF-muodossa olevien manuaalien lukemisessa.

Kindle tukee natiivisti Amazonin omaa .AWZ-formaattia, yleisesti käytettävää .MOBI-formaattia, PDF- ja TXT-tiedostoja. Netissä on saatavilla runsaasti .EPUB-tiedostoja, jotka on muunnettava Kindlen ymmärtämään muotoon esimerkiksi Calibre-ohjelmistolla.

Kindleen voi hankkia lukemista seuraavilla eri tavoilla, järjestettynä parhaimmasta tavasta huonompaan:

  • Osto Amazonin verkkokaupasta: Tämä on ehdottomasti Kindlen paras ominaisuus. Kirjauduttasi sisään Amazoniin, voit ladata lähes minkä tahansa kirjan Kindleen painamalla oikeasta reunasta “Buy now with 1-Click.” Tämän jälkeen sinun tarvitsee ainoastaan kytkeä Kindlen WLAN päälle. Parhaassa tapauksessa kirja on luettavissa viiden sekunnin päästä napin klikkauksesta. Ostokokemus on täysin omaa luokkaansa ja suorastaan häkellyttävän helppoa.
  • Ilmaisten netistä saatavien kirjojen lataaminen omalta koneelta käyttämällä Calibre-ohjelmistoa. Calibren avulla voit muuntaa lähes minkä tahansa kirjan Kindlen osaamaan .mobi-tiedostomuotoon. Kytket vain Kindlen USB:llä tietokoneeseesi ja valitset mitkä kirjat haluat ladata Kindleen.
  • Kirjan lähettäminen sähköpostin liitetiedostona <oma tunnus>@kindle.com -osoitteeseen. Voit laittaa esimerkiksi .MOBI-tiedoston sähköpostin liitteeksi, jolloin se päätyy sinulle Kindleen luettavaksi muutamassa minuutissa.
  • PDF tiedostojen lataaminen USB:llä. Voit kopioida PDF tiedostot sellaisenaan Kindleen kytkemällä sen USB:llä tietokoneeseen ilman Calibrea. PDF tiedostojen lukeminen ei ole niin mukavaa kuin Kindlelle taitetun kirjan, mutta se soveltuu silti kohtalaisesti esimerkiksi manuaalien lukemiseen.
  • Kirjojen osto Suomalaisista verkkokaupoista. Suomalaiset verkkokaupat eivät ole kovinkaan fiksuja, koska kaikki myydyt kirjat ovat DRM suojattuja. Tämän takia sinun tulee murtaa ostetun kirjan DRM suojaus käyttäen Calibrea. Tämä on täysin mahdollista ja hyvin helppoa, mutta kuvastaa silti täydellistä ymmärtämättömyyttä eBook markkinoista. Tämän jälkeen ei tarvitse ihmetellä miksi Suomalaiset kirjakaupat valittavat huonosta eBook-myynnistä.

Ilmaisia klassikkokirjoja löytää mm. Project Gutenberg:n sivuilta ja hakemalla Googlesta “ebook”, “.mobi” ja “.epub” -hakusanoilla. Valitettavasti jotkut verkkokaupat myyvät näitä ilmaiseksi saatavia kirjoja muutaman dollarin hinnalla, joten kannattaa varoa ettei maksa turhasta.

Hotswapping disk in OpenSolaris ZFS with LSI SATA card

One of my disks in a raidz2 array crashed a few days ago and it was time to hotswap a disk. zpool status showed a faulted drive:

raidz2    DEGRADED     0     0     0
  c3t6d0  ONLINE       0     0     0
  c3t7d0  FAULTED     27 85.2K     0  too many errors
  c5t0d0  ONLINE       0     0     0
  c5t1d0  ONLINE       0     0     0

The disk is attached into an LSI Logic SAS1068E B3 SATA card which has eight SATA ports. I used lsiutil to find out that there were indeed some serious problems with the disk:

Adapter Phy 7:  Link Up
  Invalid DWord Count                                     306,006
  Running Disparity Error Count                           309,292
  Loss of DWord Synch Count                                     0
  Phy Reset Problem Count                                       0

I’m not sure what “Invalid DWord Count” and “Running Disparity Error Countmeans, but that indeed doesn’t look good. I guess I need to do some googling after this. zpool status showed problems with disk c3t7d0 which is mapped into the 8th disk in the LSI card.

I replaced the old disk and added the new disk into the system on the fly. The LSI card noticed and initialized the disk, but with a different id. The disk is now c3t8d0. This is propably because the disk wasn’t the same. I ordered zfs to replace the old disk with the new one with command “zpool replace tank c3t7d0 c3t8d0

raidz2       DEGRADED     0     0     0
  c3t6d0     ONLINE       0     0     0  14.2M resilvered
  replacing  DEGRADED     0     0     0
    c3t7d0   FAULTED     27 89.2K     0  too many errors
    c3t8d0   ONLINE       0     0     0  2.03G resilvered
  c5t0d0     ONLINE       0     0     0  14.2M resilvered
  c5t1d0     ONLINE       0     0     0  13.5M resilvered

That’s it. The resilver took me 3h16m to complete.

What are the odds?

You all know this: You learn something new like a new word and then the next day you’ll stumble across this new thing you have just learned in a newspaper. Most of this can be easily explained with some brain pattern matching: you have previously come across this word many times but because you didn’t know it’s meaning you could not remember those cases, but after you learned it you’ll brain is programmed to search for those new words or things and you’ll remember your learning experience.

Yesterday I was going to my parents place and my dad picked me up from the train station and he was listening to Car Talk and he explained what the program was all about. I’m pretty sure I haven’t never listened that radio show before but I learned the concept and thinked that I wouldn’t listened that show again for a long time, mainly because I just don’t listen to radio.

And the next day I on my comic strip learning moment with my morning coffee I read todays XKCD (I read xkcd every day) strip:

Now Randall Munroe please explain this!

Tänään tein:

  1. Kävin katsomassa Kalliossa yhtä kämppää. Vaatisi täydellisen pintaremontin ja hinta remontin kanssa menee budjettini ylitse. Tai menisi, jos tietäisin mikä budjettini on. Ainakin sain lisää kokemusta näytöistä :)
  2. Ostin koirakirjan! Koirien Pikkujättiläinen – Hoito, Kasvatus ja Rodut, Ulla Kokko, WSOY. Pistin myös sisäsivuille postit-lapun, jossa Bitey kieltää mua lukemasta sivuja 171 – 189 ;)
  3. Siivosin: imuroin, järjestin tavarahyllyä, vaihdoin lakanat (toiset tyynyliinat on jossain hukassa :() ja pesin pyykkiä.
  4. Kiroilin kun Nebulan netti pätkäisee välillä.

Asuntoa katsomassa

Erinäisten vaiheiden jälkeen päädyin elämäni ensimmäistä kertaa asuntonäytöille. Olen toki lapsena käynyt yhdessä vanhempieni kanssa katsomassa uutta koko perheen asuntoa, mutta nyt menin katsomaan asuntoa yksin itselleni. 

Ensimmäisenä kohteena oli Mäkelänkadulla sijaitseva 43m^3 kaksio. Bussipysäkki talon edessä ja takuulla tarpeeksi liikenteen ääniä pitkin kesää. Rappukäytävä oli vähän huonossa kunnossa, mm. alimmassa kerroksessa rapun alla oli jotain rojua säilössä. Hauskana yksityiskohtana oli pienen keittiön ja makuuhuoneen välissä oleva pieni ikkuna. Mitä lie suunnittelija ajatellut. 134k€ velaton hinta on maksukyvyn sisällä, mutta paikka ei silti jäänyt houkuttelemaan. Itseasiassa paikasta oli vaikea saada mitään muistikuvia tänään, vaan piti käyttää hetki aivotyötä ja virkistää muistia oikotien esittelykuvilla.

Kohteiden väliin jäi reilu tunti luppoaikaa, jonka keksin hyötykäyttää moikkaamalla Isaa ja Villeä. Puheensorinan ja kahvikupin lomassa oli mukava vaihtaa kuulumisia ja puhua koirajuttuja :)

Toisena oli Kirstinkadulla sijaitseva 51m^2 kaksio, joka oli ihan kiva, mutta sisälsi täysin onnettoman keittiön. Tiedossa olisi siis keittiöremontti ja parin väliseinän tuhoaminen, mikä luultavasti tarkoittaisi myös lattian osittaista uusimista. Rahaa ja työaikaa menisi, joten 144k€ hinta on mielestäni kohtuuton.

Illalla äiti yllätti soittamalla ja listaamalla muutaman löytämän kohteen, jotka hän oli löytänyt yhdessä Eevan kanssa. Ilmeisesti kohta puoli sukua on etsimässä minulle omistusasuntoa. Toiseen näistä järjestyikin näyttö heti seuraavalle päivälle!

Hotswapping disks in OpenSolaris

Adding new SATA-disks to OpenSolaris is easy and it’s done with cfgadm command line util if the disk is in a normal ACHI SATA controller.  I have also an LSI SAS/SATA controller SAS3081E-R which uses its own utils. 

Hotpluging disk into normal ACHI SATA controller.

First add the new disk to the system and power it on (a good sata backplane is a must) and then type cfgadm to list all disks in the system:

garo@sonas:~# cfgadm
Ap_Id                          Type         Receptacle   Occupant     Condition
c3                             scsi-bus     connected    configured   unknown
pcie20                         unknown/hp   connected    configured   ok
sata4/0::dsk/c5t0d0            disk         connected    configured   ok
sata4/1                        disk         connected    unconfigured unknown
sata4/2                        sata-port    empty        unconfigured ok

This shows that disk sata4/1 is a new disk which have been added but is not yet configured. Type

garo@sonas:~# cfgadm -c configure sata4/1

Now the disks are configured. Typing cfgadm again shows that they have been configured as disks c5t0d0 and c5t1d0. They’re now ready to use in zpools.

Hotswapping disks in LSI SAS/SATA controller

I have also an LSI Logic SAS3081E-R 8-port (i:2xSFF8087) SAS PCI-e x4 SATA controller which can be used with Solaris default drivers, but it should be used with its own drivers (i used the Solaris 10 x86 drivers). After the drivers are installed you can use the lsiutil command line tool.

garo@sonas:~# lsiutil
LSI Logic MPT Configuration Utility, Version 1.61, September 18, 2008

1 MPT Port found

     Port Name         Chip Vendor/Type/Rev    MPT Rev  Firmware Rev  IOC
 1.  mpt0              LSI Logic SAS1068E B3     105      01170200     0

Select a device:  [1-1 or 0 to quit]

First select your controller (I have just one controller, so I’ll select 1). Then you can type 16 to Display attached devices, or 8 to scan for new devices. The driver will automaticly scan for new disks once a while (at least it seems so), so the disk might just pop up available to be used with zpool without you doing anything for it.

Main menu, select an option:  [1-99 or e/p/w or 0 to quit] 8

SAS1068E's links are 1.5 G, 1.5 G, 1.5 G, 1.5 G, 1.5 G, 1.5 G, 1.5 G, 1.5 G

 B___T___L  Type       Vendor   Product          Rev      SASAddress     PhyNum
 0   0   0  Disk       ATA      ST31000340AS     SD15  09221b066c554c66     5
 0   1   0  Disk       ATA      ST31000340AS     SD15  09221b066b7f676a     0
 0   2   0  Disk       ATA      ST31000340AS     SD15  09221b0669794a5d     1
 0   3   0  Disk       ATA      ST31000340AS     SD15  09221b066b7f4e6a     2
 0   4   0  Disk       ATA      ST31000340AS     SD15  09221b066b7f5b6d     3
 0   5   0  Disk       ATA      ST31000340AS     SD15  09221b066a6c6068     4
 0   6   0  Disk       ATA      ST3750330AS      SD15  0e221f04756c7148     6
 0   7   0  Disk       ATA      ST3750330AS      SD15  0e221f04758d7f40     7

OpenSolaris network performance problems with Intel e1000g network card

OpenSolaris 2008.11 has a faulted e1000g driver which results in very poor upload performance: download speeds are around 400Mbit/sec but upload speed is just about 25Mbit/sec with 1Gbps link.

There’s a workaround which involves getting older version of the driver, or user could install SXCE snv_103 (bug report here)

Instructions to apply the workaround:

  1. Download ON BFU Archives (non-debug) from older distribution
  2. Unpack the archive (bunzip2 and tar)
  3. Unpack the generic.kernel package (in archives-nightly-osol-nd/i386) with cpio -d -i generic.kernel
  4. Create new Boot Environment (read more about this from here): beadm create opensolaris-e1000gfix
  5. Mount the new environment mkdir /mnt/be and beadm mount opensolaris-e1000gfix /mnt/be
  6. You need to copy these three files into respecting places UNDER /mnt/be/: kernel/drv/e1000g  (to /mnt/be/kernel/drv/e1000g), kernel/drv/e1000g.conf and  kernel/drv/amd64/e1000g
  7. Make the new BE active: beadm activate opensolaris-e1000gfix
  8. Boot and hope for best :)